Expo - React Native 와 Firebase 활용하여 email authentication(인증) 구현하기
Expo - React Native 와 Firebase 활용하여 email authentication(인증) 구현하기
소개
처음부터 자신만의 인증을 작성하고 싶지 않다면 타사 솔루션에 도달하고 싶을 것입니다. 다행스럽게도 Firebase에는 React Native와 매우 잘 작동하는 훌륭한 인증 서비스가 있습니다.
이 자습서에서는 등록, 로그인 및 암호 재설정 흐름을 구현하는 방법을 포함하여 기존의 이메일 기반 인증으로 설정하는 방법을 보여줍니다.
참고: 이 가이드에서는 Firebase 자바스크립트 SDK 버전 9를 사용합니다 .
즉시 사용 가능한 Firebase 및 Firebase 인증 설정을 시작하려면 포털 - 내 무료 React Native 로그인 템플릿을 확인하세요 .
Firebase란 무엇인가요?
Firebase는 본질적으로 서비스로서의 백엔드입니다. Firebase는 인증, 저장 및 실시간 데이터베이스를 포함하여 모바일 애플리케이션과 함께 사용하려는 대부분의 백엔드 기능을 제공합니다.
Firebase 설치
React Native로 Firebase를 설정하는 방법에 대한 지침은 내 빠른 가이드를 확인하십시오 .
Firebase로 이메일 인증 구성
빠른 가이드 에 따라 Firebase 구성을 설정했으면 인증을 사용해야 하는 모든 구성 요소 파일에서 인증 인스턴스를 가져옵니다.
import { auth } from './yourFirebaseConfig';
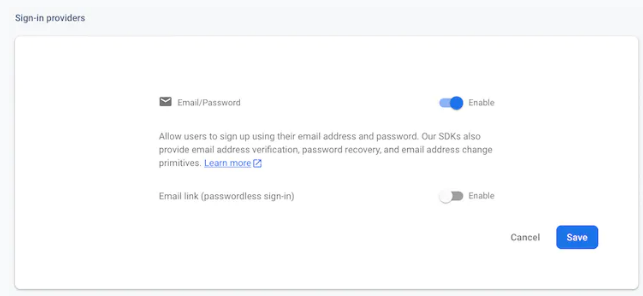
이제 Firebase 프로젝트에 대한 이메일 인증을 활성화하기만 하면 됩니다. Firebase 콘솔을 열고 인증 탭으로 이동합니다.
화면 상단의 로그인 방법 탭을 클릭합니다.
그러면 활성화된 인증 방법 목록이 나타납니다. 새 공급자 추가 버튼을 클릭합니다.

그러면 사용 가능한 인증 방법 목록이 표시됩니다. 이메일/비밀번호 옵션을 클릭하여 구성 양식을 엽니다.

그러면 사용 가능한 인증 방법 목록이 표시됩니다. 이메일/비밀번호 옵션을 클릭하여 구성 양식을 엽니다.

그러면 활성화 토글이 표시됩니다. 활성화로 설정하고 저장을 클릭하면 이제 이메일 기반 인증을 구현할 준비가 된 것입니다!
auth object 설정
import { initializeApp } from 'firebase/app';
import { getAuth } from 'firebase/auth';

// Initialize Firebase
const firebaseConfig = {
  apiKey: 'YOUR_FIREBASE_API_KEY',
  authDomain: 'YOUR_FIREBASE_AUTH_DOMAIN',
  databaseURL: 'YOUR_FIREBASE_DATABASE_URL',
  projectId: 'YOUR_FIREBASE_PROJECT_ID',
  storageBucket: 'YOUR_FIREBASE_STORAGE_BUCKET',
  messagingSenderId: 'YOUR_FIREBASE_MESSAGING_SENDER_ID',
  appId: 'YOUR_FIREBASE_APP_ID',
  measurementId: 'YOUR_FIREBASE_MEASUREMENT_ID',
};

const app = initializeApp(firebaseConfig);

export const auth = getAuth();
export default app;
사용자가 로그인했는지 확인
먼저 onAuthStateChanged라는 Firebase 메서드를 사용하여 사용자가 로그인했는지 확인합니다. 지금은 로그인 및 가입 양식이 없기 때문에 아무 작업도 수행하지 않지만 결국 이것이 라우팅의 기초가 될 것입니다.
onAuthStateChanged(auth, (user) => {
  if (user) {
    // user is logged in
  } else {
    // user is not logged in
  }
});
기본 앱 구성 요소를 만들고 이 함수에 의해 값이 설정될 loggedIn 상태를 추가해 보겠습니다.
import React, { useState } from 'react';
import { View, Text } from 'react-native';
import { onAuthStateChanged } from 'firebase/auth';

import { auth } from './firebase';

export default function App() {
  const [loggedIn, setLoggedIn] = useState(false);

  onAuthStateChanged(auth, (user) => {
    if (user) {
      setLoggedIn(true);
    } else {
      setLoggedIn(false);
    }
  });

  return (
    <View>
      <Text>App</Text>
    </View>
  );
}
이제 이 loggingIn 값을 사용하여 사용자가 로그인했는지 여부에 따라 콘텐츠를 조건부로 렌더링할 수 있습니다.
function LoggedIn() {
  return (
    <View style={{ flex: 1, justifyContent: 'center', alignItems: 'center' }}>
      <Text>Logged in</Text>
    </View>
  );
}
파일 상단의 Firebase에서 signOut 메서드를 가져옵니다.
import { signOut } from 'firebase/auth';
그런 다음 사용자를 로그아웃시키는 LoginIn 구성 요소에 메서드를 추가할 수 있습니다.
import React, { useState } from 'react';
import { View, Text, Button } from 'react-native';
import { onAuthStateChanged, signOut } from 'firebase/auth';

import { auth } from './firebase';

function LoggedIn() {
  const logout = async () => {
    try {
      await signOut(auth);
    } catch (e) {
      console.error(e);
    }
  };

  return (
    <View style={{ flex: 1, justifyContent: 'center', alignItems: 'center' }}>
      <Text>Logged in</Text>
    </View>
  );
}

export default function App() {
  //
}import React, { useState } from 'react';
import { View, Text, Button } from 'react-native';
import { onAuthStateChanged, signOut } from 'firebase/auth';
import { auth } from './firebase';
function LoggedIn() {
const logout = async () => {
try {
await signOut(auth);
} catch (e) {
console.error(e);
}
};
return (
<View style={{ flex: 1, justifyContent: 'center', alignItems: 'center' }}>
<Text>Logged in</Text>
<Button title="Log out" onPress={logout} />
</View>
);
}
export default function App() {
//
}
기본 라우팅 설정
function Signup() {
  return (
    <View style={{ flex: 1, justifyContent: 'center', alignItems: 'center' }}>
      <Text>Sign up</Text>
    </View>
  );
}
이제 사용자가 로그인했는지 여부에 따라 앱 구성 요소에 몇 가지 기본 라우팅을 추가해 보겠습니다. 지금은 LoggedIn 구성 요소와 Signup 구성 요소의 두 화면만 있습니다. 우리는 getScreen 메서드를 만든 다음 App 구성 요소의 자식으로 호출합니다. loggingIn 상태가 참이면 LoggedIn 구성 요소를 반환합니다. false이면 Signup 구성 요소를 반환합니다.
export default function App() {
  const [loggedIn, setLoggedIn] = useState(false);

  onAuthStateChanged(auth, (user) => {
    if (user) {
      setLoggedIn(true);
    } else {
      setLoggedIn(false);
    }
  });

  const getScreen = () => {
    if (loggedIn) return <LoggedIn />;
    return <Signup />;
  };

  return <View style={{ flex: 1 }}>{getScreen()}</View>;
}
function Signup() {
  const [email, setEmail] = useState('');
  const [password, setPassword] = useState('');
  const [confirmPassword, setConfirmPassword] = useState('');
  const [error, setError] = useState(null);

  return (
    <View style={{ flex: 1, justifyContent: 'center', alignItems: 'center' }}>
      <Text>Sign up</Text>
    </View>
  );
}
import { View, Text, Button, TextInput, StyleSheet } from 'react-native';
각 TextInput의 스타일을 개별적으로 지정할 수 있지만 빠르게 반복됩니다. 대신 파일 하단(구성 요소 외부)에 다음을 추가합니다.
const styles = StyleSheet.create({
  outer: {
    flex: 1,
    justifyContent: 'center',
    alignItems: 'center',
  },
  inner: {
    width: 240,
  },
  header: {
    fontSize: 24,
    fontWeight: 'bold',
    marginBottom: 20,
  },
  input: {
    borderWidth: 1,
    borderColor: '#ccc',
    borderRadius: 4,
    paddingVertical: 8,
    paddingHorizontal: 12,
    marginBottom: 16,
  },
  error: {
    marginBottom: 20,
    color: 'red',
  },
});
스타일 개체를 사용하여 이제 서로 다른 구성 요소 간에 스타일을 공유할 수 있습니다.
이제 가입 양식 구성 요소를 수정하겠습니다. 외부 컨테이너, 양식을 보관할 내부 컨테이너, 사용자 이름 및 암호 필드에 대한 세 개의 TextInput 및 제출을 처리하는 버튼을 추가하겠습니다.
function Signup() {
  const [email, setEmail] = useState('');
  const [password, setPassword] = useState('');
  const [confirmPassword, setConfirmPassword] = useState('');
  const [error, setError] = useState(null);

  const createAccount = () => {
    // create account
  };

  return (
    <View style={styles.outer}>
      <View style={styles.inner}>
        <Text style={styles.header}>Signup</Text>

        <TextInput
          value={email}
          onChangeText={setEmail}
          keyboardType="email-address"
          placeholder="Enter email address"
          autoCapitalize="none"
          placeholderTextColor="#aaa"
          style={styles.input}
        />
        <TextInput
          value={password}
          onChangeText={setPassword}
          secureTextEntry
          placeholder="Enter password"
          autoCapitalize="none"
          placeholderTextColor="#aaa"
          style={styles.input}
        />
        <TextInput
          value={confirmPassword}
          onChangeText={setConfirmPassword}
          secureTextEntry
          placeholder="Confirm password"
          autoCapitalize="none"
          placeholderTextColor="#aaa"
          style={styles.input}
        />

        <Button
          title="Create Account"
          onPress={createAccount}
          disabled={!email || !password || !confirmPassword}
        />
      </View>
    </View>
  );
}
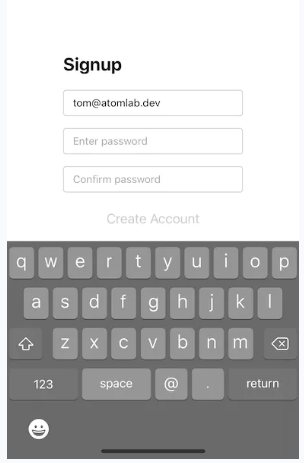
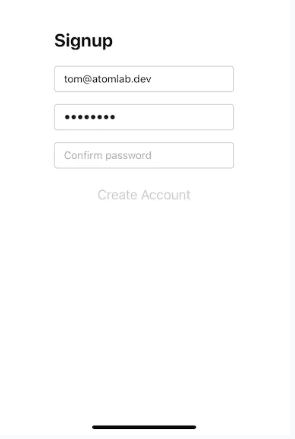
암호 필드의 경우 텍스트가 일반 텍스트로 표시되지 않고 입력될 때 별표 표시되도록 하는 secureTextEntry 속성을 추가합니다.

이제 createAccount 함수를 연결하여 실제로 Firebase를 만들고 계정을 만들 수 있습니다. createUserWithEmailAndPassword 메소드를 사용하겠습니다.
import { onAuthStateChanged, signOut, createUserWithEmailAndPassword } from 'firebase/auth';
createAccount 함수에서 메서드를 추가하고 인증 인스턴스와 이메일 및 비밀번호를 전달합니다. 그러면 제공된 자격 증명으로 계정을 생성하기 위해 Firebase에 요청을 보냅니다.
const createAccount = async () => {
  try {
    await createUserWithEmailAndPassword(auth, email, password);
  } catch (e) {
    setError('There was a problem creating your account');
  }
};
const createAccount = async () => {
  try {
    if (password === confirmPassword) {
      await createUserWithEmailAndPassword(auth, email, password);
    } else {
      setError("Passwords don't match");
    }
  } catch (e) {
    setError('There was a problem creating your account');
  }
};{
error && <Text style={styles.error}>{error}</Text>;
}
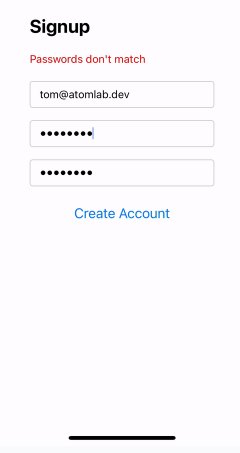
전체 가입 구성 요소는 다음과 같습니다. 구성 단계를 올바르게 수행했다고 가정하면 이제 양식을 작성하고 계정 세부정보가 Firebase 콘솔에 표시되는 것을 볼 수 있습니다!
function Signup() {
  const [email, setEmail] = useState('');
  const [password, setPassword] = useState('');
  const [confirmPassword, setConfirmPassword] = useState('');
  const [error, setError] = useState(null);

  const createAccount = async () => {
    try {
      if (password === confirmPassword) {
        await createUserWithEmailAndPassword(auth, email, password);
      } else {
        setError("Passwords don't match");
      }
    } catch (e) {
      setError('There was a problem creating your account');
    }
  };

  return (
    <View style={styles.outer}>
      <View style={styles.inner}>
        <Text style={styles.header}>Signup</Text>

        {error && <Text style={styles.error}>{error}</Text>}

        <TextInput
          value={email}
          onChangeText={setEmail}
          keyboardType="email-address"
          placeholder="Enter email address"
          autoCapitalize="none"
          placeholderTextColor="#aaa"
          style={styles.input}
        />
        <TextInput
          value={password}
          onChangeText={setPassword}
          secureTextEntry
          placeholder="Enter password"
          autoCapitalize="none"
          placeholderTextColor="#aaa"
          style={styles.input}
        />
        <TextInput
          value={confirmPassword}
          onChangeText={setConfirmPassword}
          secureTextEntry
          placeholder="Confirm password"
          autoCapitalize="none"
          placeholderTextColor="#aaa"
          style={styles.input}
        />

        <Button
          title="Create Account"
          onPress={createAccount}
          disabled={!email || !password || !confirmPassword}
        />
      </View>
    </View>
  );
}
function Login() {
  return (
    <View style={styles.outer}>
      <View style={styles.inner}>
        <Text style={styles.header}>Login</Text>
      </View>
    </View>
  );
}const [screen, setScreen] = useState(null);const getScreen = () => {
if (loggedIn) return <LoggedIn />;
if (screen === 'signup') return <Signup />;
return <Login />;
};

const getScreen = () => {
  if (loggedIn) return <LoggedIn />;
  if (screen === 'signup') return <Signup setScreen={setScreen} />;
  return <Login setScreen={setScreen} />;
};import { View, Text, Button, TextInput, StyleSheet, TouchableOpacity } from 'react-native';
const styles = StyleSheet.create({
  // ...
  link: {
    color: 'blue',
    marginBottom: 20,
  },
});
그런 다음 가입할 화면 값을 설정하는 로그인 화면에 대한 링크를 추가할 수 있습니다.
function Login({ setScreen }) {
  return (
    <View style={styles.outer}>
      <View style={styles.inner}>
        <Text style={styles.header}>Login</Text>
        <TouchableOpacity onPress={() => setScreen('signup')}>
          <Text style={styles.link}>Create an account</Text>
        </TouchableOpacity>
      </View>
    </View>
  );
}function Signup({ setScreen }) {
// ..
return (
<View style={styles.outer}>
<View style={styles.inner}>
// ...
<TouchableOpacity onPress={() => setScreen('login')}>
<Text style={styles.link}>Login to existing account</Text>
</TouchableOpacity>
// ...
</View>
</View>
);
}
function Login({ setScreen }) {
  const [email, setEmail] = useState('');
  const [password, setPassword] = useState('');
  const [error, setError] = useState(null);

  const loginUser = () => {
    //
  };

  return (
    <View style={styles.outer}>
      <View style={styles.inner}>
        <Text style={styles.header}>Login</Text>

        {error && <Text style={styles.error}>{error}</Text>}

        <TouchableOpacity onPress={() => setScreen('signup')}>
          <Text style={styles.link}>Create an account</Text>
        </TouchableOpacity>

        <TextInput
          value={email}
          onChangeText={setEmail}
          keyboardType="email-address"
          placeholder="Enter email address"
          autoCapitalize="none"
          placeholderTextColor="#aaa"
          style={styles.input}
        />
        <TextInput
          value={password}
          onChangeText={setPassword}
          secureTextEntry
          placeholder="Enter password"
          autoCapitalize="none"
          placeholderTextColor="#aaa"
          style={styles.input}
        />
        <Button title="Login" onPress={loginUser} disabled={!email || !password} />
      </View>
    </View>
  );
}
import {
  onAuthStateChanged,
  signOut,
  createUserWithEmailAndPassword,
  signInWithEmailAndPassword,
} from 'firebase/auth';
const loginUser = async () => {
  try {
    await signInWithEmailAndPassword(auth, email, password);
  } catch (error) {
    //
  }
};
const loginUser = async () => {
  try {
    await signInWithEmailAndPassword(auth, email, password);
  } catch (error) {
    if (error.code === 'auth/invalid-email' || error.code === 'auth/wrong-password') {
      setError('Your email or password was incorrect');
    } else if (error.code === 'auth/email-already-in-use') {
      setError('An account with this email already exists');
    } else {
      setError('There was a problem with your request');
    }
  }
};
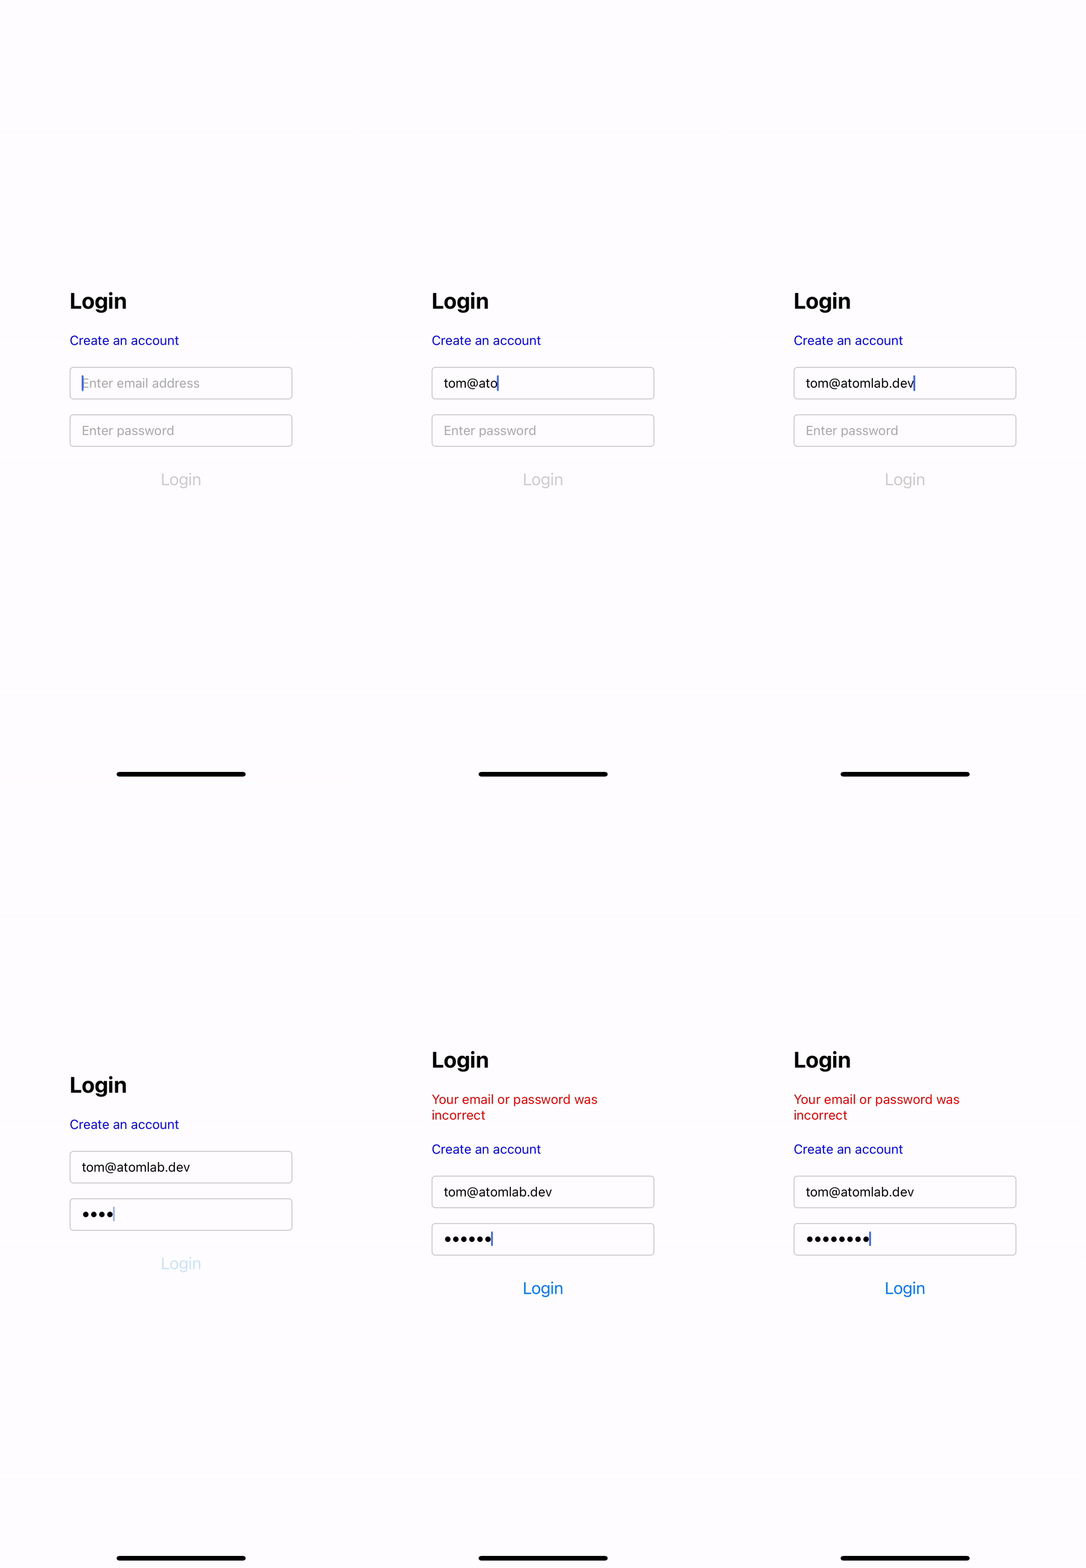
function ResetPassword() {
  return (
    <View style={styles.outer}>
      <View style={styles.inner}>
        <Text style={styles.header}>Reset Password</Text>
      </View>
    </View>
  );
}<TouchableOpacity onPress={() => setScreen('reset-password')}>
<Text style={[styles.link, { color: '#333' }]}>I've forgotten my password</Text>
</TouchableOpacity>
const getScreen = () => {
if (loggedIn) return <LoggedIn />;
if (screen === 'signup') return <Signup setScreen={setScreen} />;
if (screen === 'reset-password') return <ResetPassword setScreen={setScreen} />;
return <Login setScreen={setScreen} />;
};function ResetPassword({ setScreen }) {
return (
<View style={styles.outer}>
<View style={styles.inner}>
<Text style={styles.header}>Reset Password</Text>
<TouchableOpacity onPress={() => setScreen('login')}>
<Text style={styles.link}>Back to login</Text>
</TouchableOpacity>
</View>
</View>
);
}
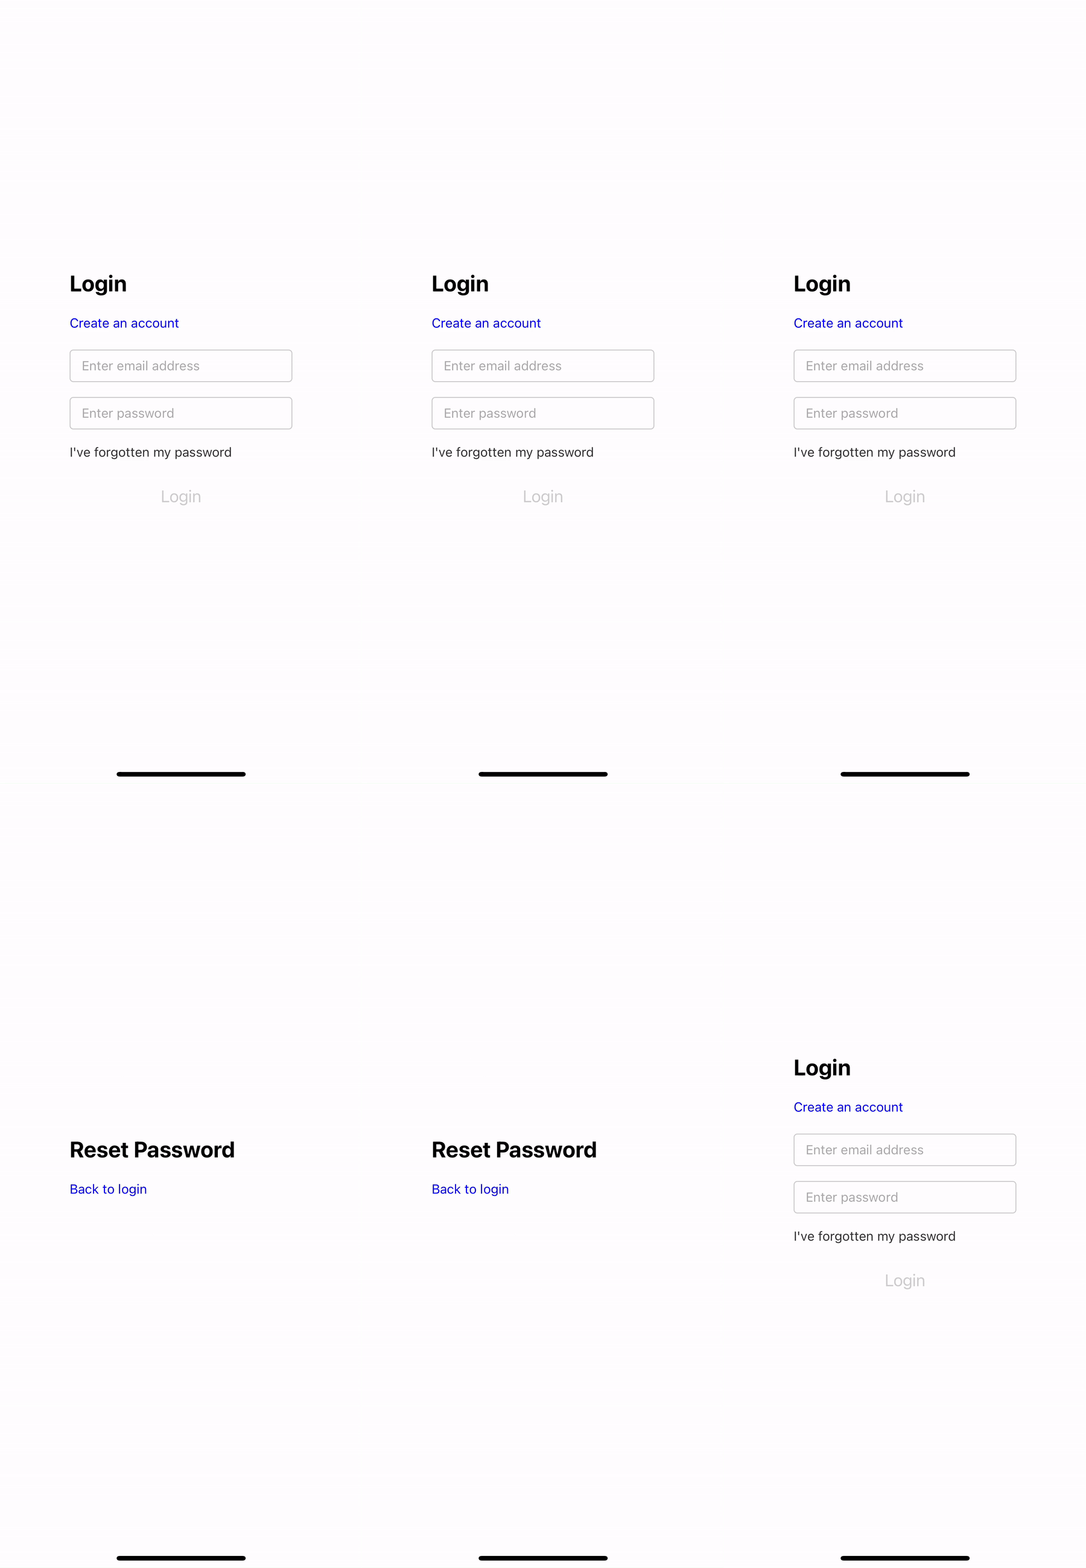
이제 로그인 양식에서 이메일 입력을 복사하고 사용자 이메일에 대한 상태 값과 제출 버튼을 추가할 수 있습니다. 다른 화면과 마찬가지로 오류 처리도 추가합니다. 한 가지 더 - 이 작업의 결과를 처리하기 위해 이 인스턴스에서 onAuthStateChanged 메서드를 사용하지 않을 것이므로 사용자에게 요청이 처리되었음을 알리고 이메일을 확인하도록 수동으로 트리거해야 합니다. 이를 위해 나중에 사용할 submit이라는 또 다른 상태를 추가합니다.
function ResetPassword({ setScreen }) {
const [email, setEmail] = useState('');
const [error, setError] = useState(null);
const [submitted, setSubmitted] = useState(false);
const resetUserPassword = () => {
//
};
return (
<View style={styles.outer}>
<View style={styles.inner}>
<Text style={styles.header}>Reset Password</Text>
{error && <Text style={styles.error}>{error}</Text>}
<TouchableOpacity onPress={() => setScreen('login')}>
<Text style={styles.link}>Back to login</Text>
</TouchableOpacity>
<TextInput
value={email}
onChangeText={setEmail}
keyboardType="email-address"
placeholder="Enter email address"
autoCapitalize="none"
placeholderTextColor="#aaa"
style={styles.input}
/>
<Button title="Reset Password" onPress={resetUserPassword} disabled={!email} />
</View>
</View>
);
}
import {
onAuthStateChanged,
signOut,
createUserWithEmailAndPassword,
signInWithEmailAndPassword,
sendPasswordResetEmail,
} from 'firebase/auth';그런 다음 resetUserPassword 함수에서 인증 인스턴스와 사용자가 제공한 이메일 주소를 전달하여 이 메서드를 호출합니다. 요청이 성공하면 submit을 true로 설정하고 실패하면 기본 오류 처리를 제공합니다.
const resetUserPassword = async () => {
try {
await sendPasswordResetEmail(auth, email);
setSubmitted(true);
setError(null);
} catch (error) {
if (error.code === 'auth/user-not-found') {
setError('User not found');
} else {
setError('There was a problem with your request');
}
}
};function ResetPassword({ setScreen }) {
const [email, setEmail] = useState('');
const [error, setError] = useState(null);
const [submitted, setSubmitted] = useState(false);
const resetUserPassword = async () => {
try {
await sendPasswordResetEmail(auth, email);
setSubmitted(true);
setError(null);
} catch (error) {
if (error.code === 'auth/user-not-found') {
setError('User not found');
} else {
setError('There was a problem with your request');
}
}
};
return (
<View style={styles.outer}>
<View style={styles.inner}>
<Text style={styles.header}>Reset Password</Text>
{error && <Text style={styles.error}>{error}</Text>}
<TouchableOpacity onPress={() => setScreen('login')}>
<Text style={styles.link}>Back to login</Text>
</TouchableOpacity>
{submitted ? (
<Text>Please check your email for a reset password link.</Text>
) : (
<>
<TextInput
value={email}
onChangeText={setEmail}
keyboardType="email-address"
placeholder="Enter email address"
autoCapitalize="none"
placeholderTextColor="#aaa"
style={styles.input}
/>
<Button title="Reset Password" onPress={resetUserPassword} disabled={!email} />
</>
)}
</View>
</View>
);
}
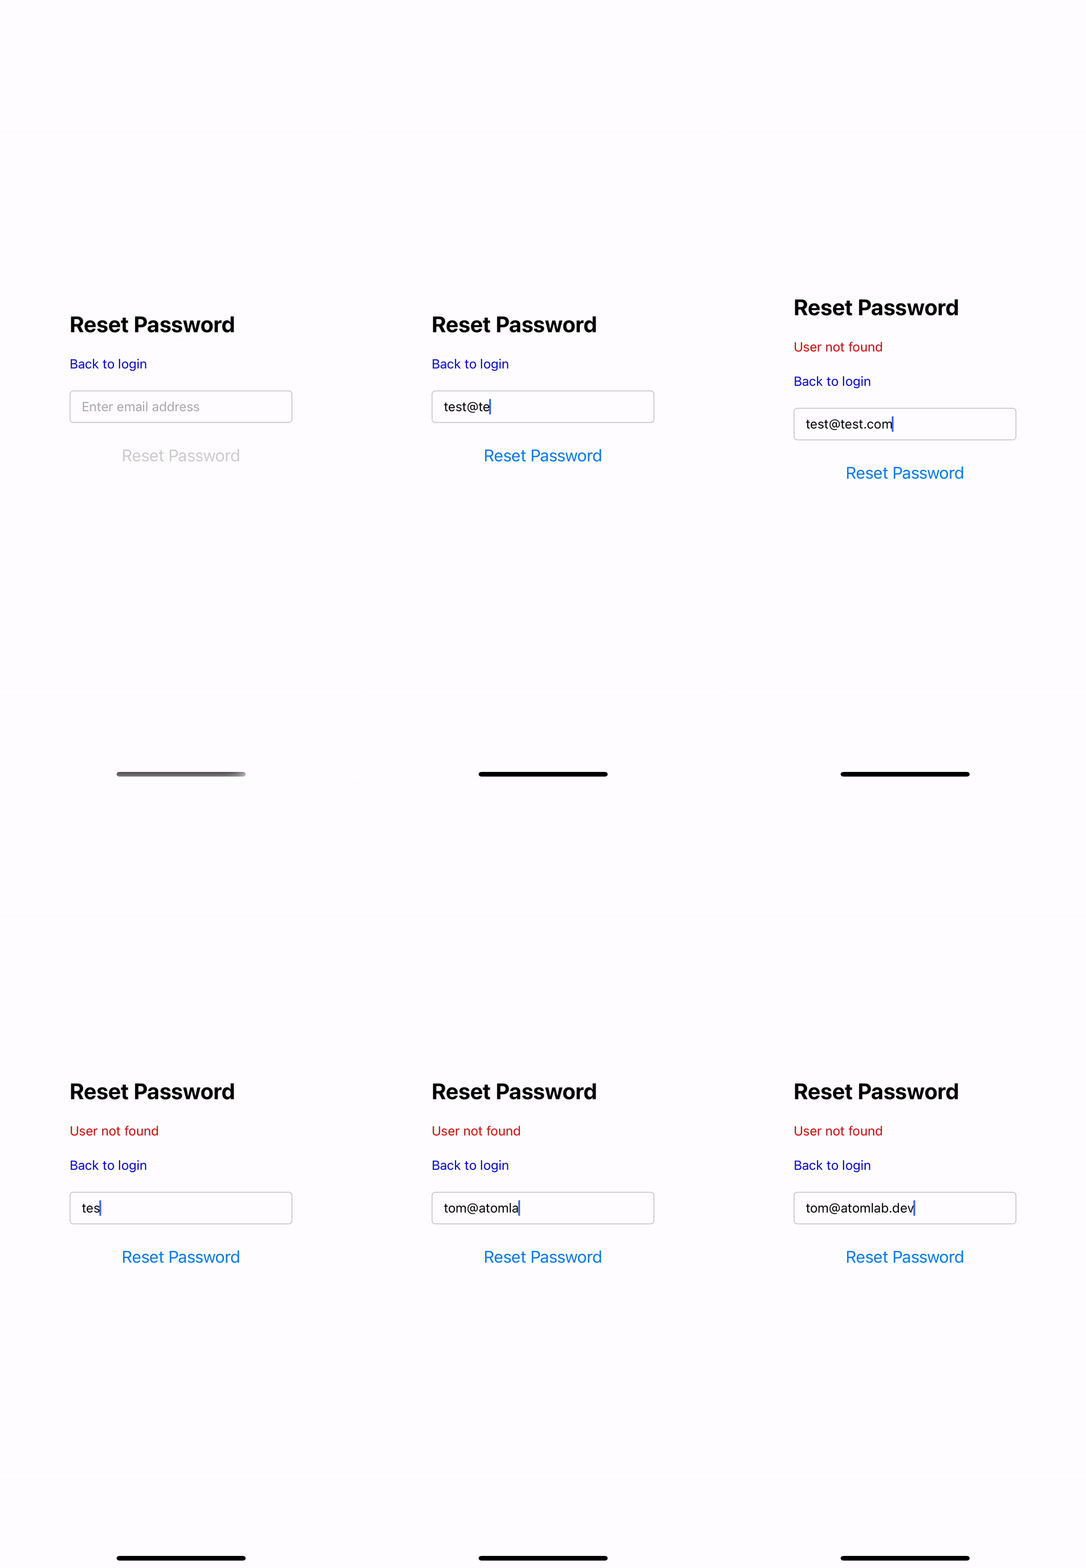
결론
GitHub - atomlabdev/react-native-firebase-auth-example
Contribute to atomlabdev/react-native-firebase-auth-example development by creating an account on GitHub.
github.com
React Native Login Screen Template - React Native login screen template with Firebase
React Native login screen template with Firebase
www.atomlab.dev
App.js 전체 소스
import React, { useState } from 'react';
import { View, Text, Button, TextInput, StyleSheet, TouchableOpacity } from 'react-native';
import {
onAuthStateChanged,
signOut,
createUserWithEmailAndPassword,
signInWithEmailAndPassword,
sendPasswordResetEmail,
} from 'firebase/auth';
import { auth } from './firebase';
function LoggedIn() {
const logout = async () => {
try {
await signOut(auth);
} catch (e) {
console.error(e);
}
};
return (
<View style={{ flex: 1, justifyContent: 'center', alignItems: 'center' }}>
<Text>Logged in</Text>
<Button title="Log out" onPress={logout} />
</View>
);
}
function Signup({ setScreen }) {
const [email, setEmail] = useState('');
const [password, setPassword] = useState('');
const [confirmPassword, setConfirmPassword] = useState('');
const [error, setError] = useState(null);
const createAccount = async () => {
try {
if (password === confirmPassword) {
await createUserWithEmailAndPassword(auth, email, password);
} else {
setError("Passwords don't match");
}
} catch (e) {
setError('There was a problem creating your account');
}
};
return (
<View style={styles.outer}>
<View style={styles.inner}>
<Text style={styles.header}>Signup</Text>
{error && <Text style={styles.error}>{error}</Text>}
<TouchableOpacity onPress={() => setScreen('login')}>
<Text style={styles.link}>Login to existing account</Text>
</TouchableOpacity>
<TextInput
value={email}
onChangeText={setEmail}
keyboardType="email-address"
placeholder="Enter email address"
autoCapitalize="none"
placeholderTextColor="#aaa"
style={styles.input}
/>
<TextInput
value={password}
onChangeText={setPassword}
secureTextEntry
placeholder="Enter password"
autoCapitalize="none"
placeholderTextColor="#aaa"
style={styles.input}
/>
<TextInput
value={confirmPassword}
onChangeText={setConfirmPassword}
secureTextEntry
placeholder="Confirm password"
autoCapitalize="none"
placeholderTextColor="#aaa"
style={styles.input}
/>
<Button
title="Create Account"
onPress={createAccount}
disabled={!email || !password || !confirmPassword}
/>
</View>
</View>
);
}
function Login({ setScreen }) {
const [email, setEmail] = useState('');
const [password, setPassword] = useState('');
const [error, setError] = useState(null);
const loginUser = async () => {
try {
await signInWithEmailAndPassword(auth, email, password);
} catch (error) {
if (error.code === 'auth/invalid-email' || error.code === 'auth/wrong-password') {
setError('Your email or password was incorrect');
} else if (error.code === 'auth/email-already-in-use') {
setError('An account with this email already exists');
} else {
setError('There was a problem with your request');
}
}
};
return (
<View style={styles.outer}>
<View style={styles.inner}>
<Text style={styles.header}>Login</Text>
{error && <Text style={styles.error}>{error}</Text>}
<TouchableOpacity onPress={() => setScreen('signup')}>
<Text style={styles.link}>Create an account</Text>
</TouchableOpacity>
<TextInput
value={email}
onChangeText={setEmail}
keyboardType="email-address"
placeholder="Enter email address"
autoCapitalize="none"
placeholderTextColor="#aaa"
style={styles.input}
/>
<TextInput
value={password}
onChangeText={setPassword}
secureTextEntry
placeholder="Enter password"
autoCapitalize="none"
placeholderTextColor="#aaa"
style={styles.input}
/>
<TouchableOpacity onPress={() => setScreen('reset-password')}>
  <Text style={[styles.link, { color: '#333' }]}>I've forgotten my password</Text>
</TouchableOpacity>
<Button title="Login" onPress={loginUser} disabled={!email || !password} />
</View>
</View>
);
}
function ResetPassword({ setScreen }) {
const [email, setEmail] = useState('');
const [error, setError] = useState(null);
const [submitted, setSubmitted] = useState(false);
const resetUserPassword = async () => {
try {
await sendPasswordResetEmail(auth, email);
setSubmitted(true);
setError(null);
} catch (error) {
if (error.code === 'auth/user-not-found') {
setError('User not found');
} else {
setError('There was a problem with your request');
}
}
};
return (
<View style={styles.outer}>
<View style={styles.inner}>
<Text style={styles.header}>Reset Password</Text>
{error && <Text style={styles.error}>{error}</Text>}
<TouchableOpacity onPress={() => setScreen('login')}>
<Text style={styles.link}>Back to login</Text>
</TouchableOpacity>
{submitted ? (
<Text>Please check your email for a reset password link.</Text>
) : (
<>
<TextInput
value={email}
onChangeText={setEmail}
keyboardType="email-address"
placeholder="Enter email address"
autoCapitalize="none"
placeholderTextColor="#aaa"
style={styles.input}
/>
<Button title="Reset Password" onPress={resetUserPassword} disabled={!email} />
</>
)}
</View>
</View>
);
}
export default function App() {
const [loggedIn, setLoggedIn] = useState(false);
const [screen, setScreen] = useState(null);
onAuthStateChanged(auth, (user) => {
if (user) {
setLoggedIn(true);
} else {
setLoggedIn(false);
}
});
const getScreen = () => {
  if (loggedIn) return <LoggedIn />;
  if (screen === 'signup') return <Signup setScreen={setScreen} />;
  if (screen === 'reset-password') return <ResetPassword setScreen={setScreen} />;
  return <Login setScreen={setScreen} />;
};
return <View style={{ flex: 1 }}>{getScreen()}</View>;
}
const styles = StyleSheet.create({
outer: {
flex: 1,
justifyContent: 'center',
alignItems: 'center',
},
inner: {
width: 240,
},
header: {
fontSize: 24,
fontWeight: 'bold',
marginBottom: 20,
},
input: {
borderWidth: 1,
borderColor: '#ccc',
borderRadius: 4,
paddingVertical: 8,
paddingHorizontal: 12,
marginBottom: 16,
},
error: {
marginBottom: 20,
color: 'red',
},
link: {
color: 'blue',
marginBottom: 20,
},
});
원본 출처
https://www.atomlab.dev/tutorials/email-authentication-react-native-firebase
How to setup email authentication with React Native and Firebase
A guide on setting up email authentication with React Native and Firebase - including login, signup and password reset flows
www.atomlab.dev
'프로그래밍 > React Native' 카테고리의 다른 글
| Expo 와 React Native 및 안드로이드 apk 배포까지 (0) | 2023.11.18 |
|---|