.Net Core 6.0 Web API 의 JWT Token 인증 및 권한 부여
JWT Token Authentication And Authorizations In .Net Core 6.0 Web API
이 단계별 자습서에서는 웹 API .net core 6.0 프로젝트에서 JWT 토큰을 사용하는 방법을 보여줍니다. 이 자습서에서는 다음 항목을 다룹니다.
- JWT access token 을 만드는 방법
- web API endpoint를 승인하는 방법
시작하기 전에 인증 및 권한 부여 개념을 알고 있어야 합니다. 위키피디아에 따르면,
- 인증 - 컴퓨터 시스템 사용자의 ID와 같은 주장을 증명하는 행위입니다. 사람이나 사물의 신원을 나타내는 행위인 식별과 달리 인증은 해당 신원을 확인하는 과정입니다.
- 권한 부여 - 일반적인 정보 보안 및 컴퓨터 보안과 관련된 자원, 특히 접근 제어에 대한 접근 권한/특권을 지정하는 기능입니다.
1단계. 웹 API 프로젝트 생성
시작하자. 먼저 Visual Studio를 열고 새 프로젝트를 만들어야 합니다.

이제 웹 API 템플릿을 선택합니다.

그런 다음 솔루션에 이름을 지정하고 솔루션을 배치할 폴더를 선택하십시오.

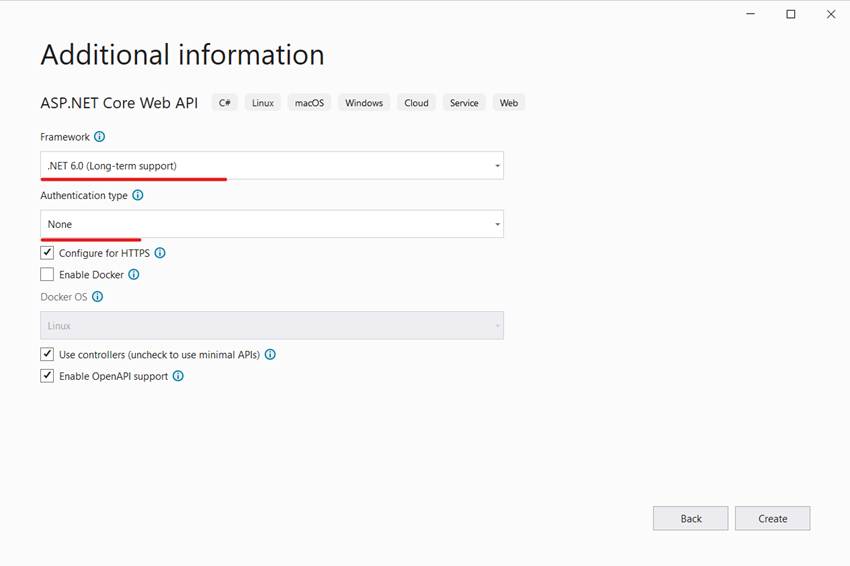
사용자 정의 JWT 인증을 구현하고 있으므로 .net 6 프레임워크 및 인증 유형을 없음으로 선택하십시오.

2단계. Nuget 패키지 설치
그런 다음 Nuget 패키지 관리자를 열고 다음 패키지의 최신 버전을 설치합니다.
- Microsoft.AspNetCore.Authentication.JwtBearer
- Microsoft.IdentityModel.JsonWebTokens
- System.IdentityModel.Tokens.Jwt

3단계. 모델 및 설정 추가
프로젝트 루트 디렉터리 이름에 "Models"로 새 폴더를 추가하고 "JwtSettings" 및 "UserTokens"라는 새 클래스를 추가합니다.
JwtSettings.cs 파일,
namespace WebApplication.Models;
public class JwtSettings {
    public bool ValidateIssuerSigningKey {
        get;
        set;
    }
    public string IssuerSigningKey {
        get;
        set;
    }
    public bool ValidateIssuer {
        get;
        set;
    } = true;
    public string ValidIssuer {
        get;
        set;
    }
    public bool ValidateAudience {
        get;
        set;
    } = true;
    public string ValidAudience {
        get;
        set;
    }
    public bool RequireExpirationTime {
        get;
        set;
    }
    public bool ValidateLifetime {
        get;
        set;
    } = true;
}
UserTokens.cs file
namespace WebApplication.Models;
public class UserTokens {
    public string Token {
        get;
        set;
    }
    public string UserName {
        get;
        set;
    }
    public TimeSpan Validaty {
        get;
        set;
    }
    public string RefreshToken {
        get;
        set;
    }
    public Guid Id {
        get;
        set;
    }
    public string EmailId {
        get;
        set;
    }
    public Guid GuidId {
        get;
        set;
    }
    public DateTime ExpiredTime {
        get;
        set;
    }
}
그런 다음 LOC(Line of code)를 변경하지 않고 appsettings.json에서 토큰 생성 설정을 전역적으로 변경할 수 있도록 앱 설정에 일부 설정을 추가해야 합니다.
참고: 유효한 발급자와 유효한 대상의 로컬 URL을 변경하는 것을 잊지 마십시오.
"JsonWebTokenKeys": {
    "ValidateIssuerSigningKey": true,
    "IssuerSigningKey": "64A63153-11C1-4919-9133-EFAF99A9B456",
    "ValidateIssuer": true,
    "ValidIssuer": "https://localhost:7168",
    "ValidateAudience": true,
    "ValidAudience": "https://localhost:7168",
    "RequireExpirationTime": true,
    "ValidateLifetime": true
},

다음 단계는 Token 및 Refresh Token 및 Token 유효성 검증에 사용되는 JWT Helper 클래스를 추가하는 것입니다.
클래스를 추가하려면 먼저 루트 프로젝트에 "JwtHelpers" 폴더를 만든 다음 클래스를 생성 후 아래의 코드를 입력합니다.
using Microsoft.IdentityModel.Tokens;
using System.IdentityModel.Tokens.Jwt;
using System.Security.Claims;
using WebApplication.Models;

namespace WebApplication.JwtHelpers
{
    public static class JwtHelpers
    {
        public static IEnumerable<Claim> GetClaims(this UserTokens userAccounts, Guid Id)
        {
            IEnumerable<Claim> claims = new Claim[]
                    {
                        new Claim("Id",userAccounts.Id.ToString()),
                        new Claim(ClaimTypes.Name, userAccounts.UserName),
                        new Claim(ClaimTypes.Email, userAccounts.EmailId),
                        new Claim(ClaimTypes.NameIdentifier,Id.ToString()),
                        new Claim(ClaimTypes.Expiration,DateTime.UtcNow.AddDays(1).ToString("MMM ddd dd yyyy HH:mm:ss tt") )
                    };
            return claims;
        }

        public static IEnumerable<Claim> GetClaims(this UserTokens userAccounts, out Guid Id)
        {
            Id = Guid.NewGuid();
            return GetClaims(userAccounts, Id);
        }

        public static UserTokens GenTokenkey(UserTokens model, JwtSettings jwtSettings)
        {
            try
            {
                var UserToken = new UserTokens();
                if (model == null) throw new ArgumentException(nameof(model));

                // Get secret key
                var key = System.Text.Encoding.ASCII.GetBytes(jwtSettings.IssuerSigningKey);
                Guid Id = Guid.Empty;
                DateTime expireTime = DateTime.UtcNow.AddDays(1);
                UserToken.Validaty = expireTime.TimeOfDay;
                var JWToken = new JwtSecurityToken(
                    issuer: jwtSettings.ValidIssuer,
                    audience: jwtSettings.ValidAudience,
                    claims: GetClaims(model, out Id),
                    notBefore: new DateTimeOffset(DateTime.Now).DateTime,
                    expires: new DateTimeOffset(expireTime).DateTime,
                    signingCredentials: new SigningCredentials
                    (new SymmetricSecurityKey(key), SecurityAlgorithms.HmacSha256)
                );

                UserToken.Token = new JwtSecurityTokenHandler().WriteToken(JWToken);
                var idRefreshToken = Guid.NewGuid();

                UserToken.UserName = model.UserName;
                UserToken.Id = model.Id;
                UserToken.GuidId = Id;
                return UserToken;
            }
            catch (Exception)
            {
                throw;
            }
        }
    }
}
여기서 GetClaims() 메서드는 사용자 토큰 세부 정보에서 반환 클레임 목록을 만드는 데 사용됩니다.
// Get secret key
var key = System.Text.Encoding.ASCII.GetBytes(jwtSettings.IssuerSigningKey);
Guid Id = Guid.Empty;
DateTime expireTime = DateTime.UtcNow.AddDays(1);
이제 appsettings에서 지정된 키의 바이트 배열을 가져오고 여기서 토큰 만료를 토큰이 생성된 날로부터 1일로 정의합니다.
var JWToken = new JwtSecurityToken(issuer: jwtSettings.ValidIssuer, audience: jwtSettings.ValidAudience, claims: GetClaims(model, out Id), notBefore: new DateTimeOffset(DateTime.Now).DateTime, expires: new DateTimeOffset(expireTime).DateTime, signingCredentials: new SigningCredentials(new SymmetricSecurityKey(key), SecurityAlgorithms.HmacSha256));
UserToken.Token = new JwtSecurityTokenHandler().WriteToken(JWToken);
그런 다음 JwtSecurityTokenHandler의 WriteToken() 메서드/함수를 사용하여 생성된 보안 토큰과 access token 을 할당했습니다.
그런 다음 프로그램 파일에서 몇 가지 설정을 수행해야 합니다. JWT 토큰을 사용하려면 서비스를 주입해야 합니다.
.net3.1의 이전 버전에서는 서비스를 inject 하고 프로젝트에서 사용해야 하는 startup.cs 파일을 분리했지만 .net6 에선 startup.cs 일은 더 이상 존재하지 않습니다.

따라서 service 를 inject 하기 위해 "AddJWTTokenServicesExtensions"라는 새 클래스를 만들어 관심사분리(separation of concern) 하고 program.cs 를 엉망으로 만들지 않게 먼저 루트 프로젝트에 "Extensions"라는 폴더를 만듭니다. 그런 다음 AddJWTTokenServicesExtensions 클래스를 만듭니다.
관심사분리 : 프로그램을 하나의 단일 블록으로 작성하지 말고 작은 조각으로 나누어 각각 간단한 개별 작업을 완료할 수 있도록 만드는 것입니다.
출처: https://kaki104.tistory.com/725 [Future Of DotNet]
영문 해석
Then we have to do some settings in the program file. We need to inject services to use JWT Token.
In a previous version of .net3.1, we have separated startup files where we have to inject services and use them in your project but the .net6 startup file is no longer exists. So, to inject services let's create a New Class named “AddJWTTokenServicesExtensions” to the separation of concern and without messing off the program.cs first create folder named “Extensions” in your root project. Then create class AddJWTTokenServicesExtensions.
이 부분이 .net 6.0 에서 기존의 5.0 이하버전과 다른 부분이라 구현을 어떻게 해야 할지 처음에 당황스러운 부분입니다.

주의 사항
program.cs에서 해당 메서드를 호출해야 하기 때문에 여기에서 이러한 클래스를 정적 클래스로 만들어야 합니다.
using Microsoft.AspNetCore.Authentication.JwtBearer;
using Microsoft.IdentityModel.Tokens;
using WebApplication.Models;

namespace WebApplication.Extensions
{
    public static class AddJWTTokenServicesExtensions
    {
        public static void AddJWTTokenServices(this IServiceCollection Services, IConfiguration Configuration)
        {
            // Add Jwt Setings
            var bindJwtSettings = new JwtSettings();
            Configuration.Bind("JsonWebTokenKeys", bindJwtSettings);
            Services.AddSingleton(bindJwtSettings);


            Services.AddAuthentication(options => {
                options.DefaultAuthenticateScheme = JwtBearerDefaults.AuthenticationScheme;
                options.DefaultChallengeScheme = JwtBearerDefaults.AuthenticationScheme;
            }).AddJwtBearer(options => {
                options.SaveToken = true;
                options.TokenValidationParameters = new Microsoft.IdentityModel.Tokens.TokenValidationParameters()
                {
                    ValidateIssuerSigningKey = bindJwtSettings.ValidateIssuerSigningKey,
                    IssuerSigningKey = new SymmetricSecurityKey(System.Text.Encoding.UTF8.GetBytes(bindJwtSettings.IssuerSigningKey)),
                    ValidateIssuer = bindJwtSettings.ValidateIssuer,
                    ValidIssuer = bindJwtSettings.ValidIssuer,
                    ValidateAudience = bindJwtSettings.ValidateAudience,
                    ValidAudience = bindJwtSettings.ValidAudience,
                    RequireExpirationTime = bindJwtSettings.RequireExpirationTime,
                    ValidateLifetime = bindJwtSettings.RequireExpirationTime,
                    ClockSkew = TimeSpan.FromDays(1),
                };
            });
        }
    }

}
위의 코드를 "AddJWTTokenServicesExtensions.cs" 파일에 추가합니다.
그런 다음 program.cs 클래스에서 이 확장 메서드를 호출해야 할 필요성을 추가합니다.
program.cs의 첫 번째 줄에 using 추가
using WebApplication.Extensions;
빌더 객체 생성 후 AddJWTTokenServices() 메소드 호출
using WebApplication.Extensions;
var builder = Microsoft.AspNetCore.Builder.WebApplication.CreateBuilder(args);
// Add services to the container.
builder.Services.AddJWTTokenServices(builder.Configuration);
program.cs 파일을 아래와 같이 만듭니다.
using WebApplication.Extensions;
var builder = Microsoft.AspNetCore.Builder.WebApplication.CreateBuilder(args);

// Add services to the container.
builder.Services.AddJWTTokenServices(builder.Configuration);

builder.Services.AddControllers();
// Learn more about configuring Swagger/OpenAPI at https://aka.ms/aspnetcore/swashbuckle
builder.Services.AddEndpointsApiExplorer();
builder.Services.AddSwaggerGen(options =>
{
    options.AddSecurityDefinition("Bearer", new Microsoft.OpenApi.Models.OpenApiSecurityScheme
    {
        Name = "Authorization",
        Type = Microsoft.OpenApi.Models.SecuritySchemeType.Http,
        Scheme = "Bearer",
        BearerFormat = "JWT",
        In = Microsoft.OpenApi.Models.ParameterLocation.Header,
        Description = "JWT Authorization header using the Bearer scheme."
    });
    options.AddSecurityRequirement(new Microsoft.OpenApi.Models.OpenApiSecurityRequirement
    {
        {
                new Microsoft.OpenApi.Models.OpenApiSecurityScheme
                {
                    Reference = new Microsoft.OpenApi.Models.OpenApiReference
                    {
                        Type = Microsoft.OpenApi.Models.ReferenceType.SecurityScheme,
                        Id = "Bearer"
                    }
                },
                new string[] {}
        }
    });
});

var app = builder.Build();

// Configure the HTTP request pipeline.
//if (app.Environment.IsDevelopment())
{
    app.UseSwagger();
    app.UseSwaggerUI();
}

app.UseHttpsRedirection();

app.UseAuthorization();

app.MapControllers();

app.Run();
컨트롤러 구현인 다음 단계로 이동해 보겠습니다.
AccountController.cs 에 WebAPI 컨트롤러 추가
여기서는 데이터베이스를 사용하지 않고 사용자를 확인하고 access token 을 생성하고 인증 및 승인된 웹 API 컨트롤러를 생성하기 위해 정적 값만 사용합니다.
models 폴더에 Users 클래스 추가 생성
namespace WebApplication.Models {
    public class Users {
        public string UserName {
            get;
            set;
        }
        public Guid Id {
            get;
            set;
        }
        public string EmailId {
            get;
            set;
        }
        public string Password {
            get;
            set;
        }
    }
}
다음 코드를 사용하여 models 폴더에 새 클래스 UserLogins 를 추가하여 만듭니다.
using System.ComponentModel.DataAnnotations;
namespace WebApplication.Models {
    public class UserLogins {
        [Required]
        public string UserName {
            get;
            set;
        }
        [Required]
        public string Password {
            get;
            set;
        }
        public UserLogins() {}
    }
}
새 컨트롤러 추가 -> 템플릿에서 API 컨트롤러 -> Empty 을 선택합니다.

다음 코드를 추가합니다.
using Microsoft.AspNetCore.Authorization;
using Microsoft.AspNetCore.Http;
using Microsoft.AspNetCore.Mvc;
using WebApplication.Models;
namespace WebApplication.Controllers {
    [Route("api/[controller]/[action]")]
    [ApiController]
    public class AccountController: ControllerBase {
        private readonly JwtSettings jwtSettings;
        public AccountController(JwtSettings jwtSettings) {
            this.jwtSettings = jwtSettings;
        }
        private IEnumerable < Users > logins = new List < Users > () {
            new Users() {
                    Id = Guid.NewGuid(),
                        EmailId = "adminakp@gmail.com",
                        UserName = "Admin",
                        Password = "Admin",
                },
                new Users() {
                    Id = Guid.NewGuid(),
                        EmailId = "adminakp@gmail.com",
                        UserName = "User1",
                        Password = "Admin",
                }
        };
        [HttpPost]
        public IActionResult GetToken(UserLogins userLogins) {
            try {
                var Token = new UserTokens();
                var Valid = logins.Any(x => x.UserName.Equals(userLogins.UserName, StringComparison.OrdinalIgnoreCase));
                if (Valid) {
                    var user = logins.FirstOrDefault(x => x.UserName.Equals(userLogins.UserName, StringComparison.OrdinalIgnoreCase));
                    Token = JwtHelpers.JwtHelpers.GenTokenkey(new UserTokens() {
                        EmailId = user.EmailId,
                            GuidId = Guid.NewGuid(),
                            UserName = user.UserName,
                            Id = user.Id,
                    }, jwtSettings);
                } else {
                    return BadRequest($ "wrong password");
                }
                return Ok(Token);
            } catch (Exception ex) {
                throw;
            }
        }
        /// <summary>
        /// Get List of UserAccounts
        /// </summary>
        /// <returns>List Of UserAccounts</returns>
        [HttpGet]
        [Authorize(AuthenticationSchemes = Microsoft.AspNetCore.Authentication.JwtBearer.JwtBearerDefaults.AuthenticationScheme)]
        public IActionResult GetList() {
            return Ok(logins);
        }
    }
}
위의 계정에서 컨트롤러는 유효한 사용자인 로그인 세부 정보 목록을 생성했습니다. 데이터베이스 레코드를 사용하여 사용자 로그인을 확인할 수 있습니다. 다음으로 JWT Hepler를 사용하여 로그인 자격 증명(credentials)을 확인하고 tokens 을 생성하는 방법을 만들었습니다.
그리고 swagger의 권한 부여를 확인하려면 열어서 program.cs를 교체하십시오.
builder.Services.AddSwaggerGen();다음 코드는...
builder.Services.AddSwaggerGen(options => {
    options.AddSecurityDefinition("Bearer", new Microsoft.OpenApi.Models.OpenApiSecurityScheme {
        Name = "Authorization",
            Type = Microsoft.OpenApi.Models.SecuritySchemeType.Http,
            Scheme = "Bearer",
            BearerFormat = "JWT",
            In = Microsoft.OpenApi.Models.ParameterLocation.Header,
            Description = "JWT Authorization header using the Bearer scheme."
    });
    options.AddSecurityRequirement(new Microsoft.OpenApi.Models.OpenApiSecurityRequirement {
        {
            new Microsoft.OpenApi.Models.OpenApiSecurityScheme {
                    Reference = new Microsoft.OpenApi.Models.OpenApiReference {
                        Type = Microsoft.OpenApi.Models.ReferenceType.SecurityScheme,
                            Id = "Bearer"
                    }
                },
                new string[] {}
        }
    });
});
swagger로 웹 API를 확인하려면 swagger에 권한 부여 보안 옵션(authorization security options)을 추가해야 하므로 AddSecurityDefination() 및 AddSecurityRequirement() 함수를 사용하여 보안 옵션을 추가합니다.
응용 프로그램을 실행한 후 아래와 같이 swagger 결과를 얻을 수 있습니다.

사용자 이름과 암호를 지정하여 토큰을 가져오도록 합시다.

아래와 같이 토큰을 받게 됩니다.

토큰을 전달하지 않으면 아래에 결과가 표시되며 401 오류가 발생합니다.


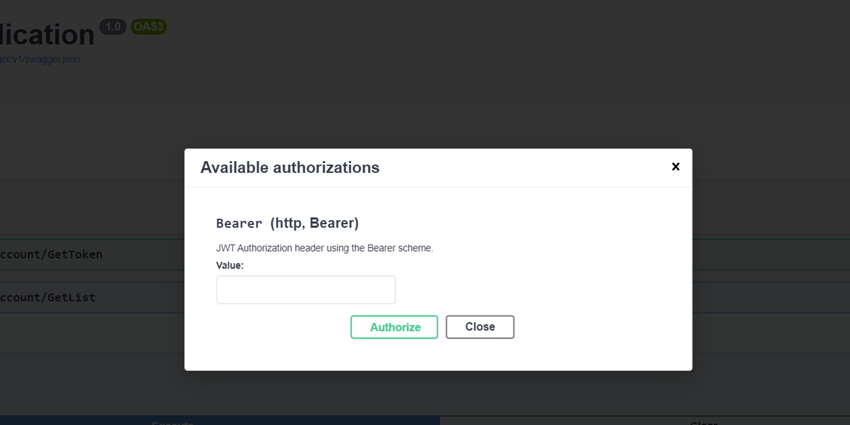
열쇠모양의 아이콘을 선택하면 모달 창이 아래와 같이 뜨며, value 입력란에 발행된 토큰값을 붙여 넣고 Authorize 버튼을 선택하면 됩니다. 그리고 close 로 모달창을 닫습니다.

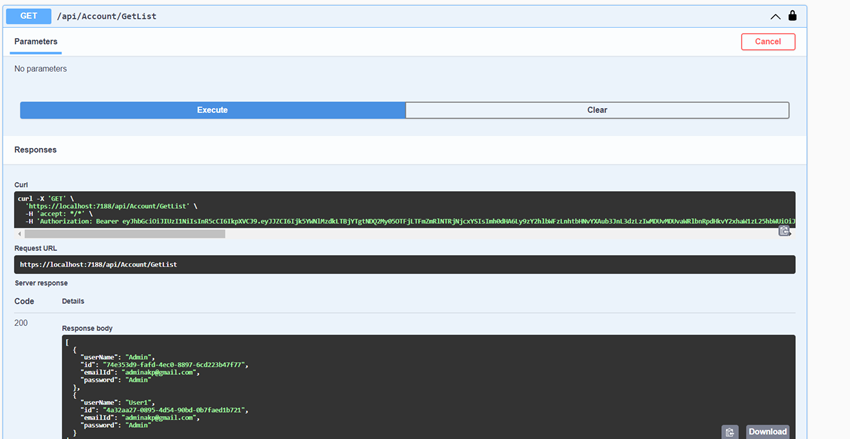
그런 다음 Execute 를 실행하면 문제 없이 json 형태의 결과값을 제공해 줍니다. 토큰 값이 잘못 되면 맞지 않다고 오류 발생합니다.

요약
이 기사에서는 JWT access token 을 생성하는 방법에 대해 설명했습니다. 또한 WEB API endpoint 를 인증하는 방법도 보았습니다.
발췌 사이트 및 번역
JWT Token Authentication And Authorizations In .Net Core 6.0 Web API
In this article, you will learn about Jwt Token Authentication and Authorizations in .Net Core 6.0 WEB API.
www.c-sharpcorner.com