ASP.NET 6.0 Web API 로 Redis Cache 사용해 보기(Parallel.ForEach 활용)
소개
Caching 은 파일이나 데이터의 복사본을 캐시나 임시 저장 위치에 저장하여 보다 빠르게 액세스할 수 있도록 하는 프로세스입니다. 데이터 또는 파일을 특정 기간 동안 임시 저장소에 저장하는 과정으로, 다음부터는 데이터가 요청될 때 데이터베이스가 아닌 이 임시 저장소 또는 원본 파일에서 제공될 수 있습니다. 이 게시물에서는 Windows에서 Redis 캐시를 설치하고 사용하는 방법에 대해 알아봅니다. 우리는 ASP.NET 6.0 Web API를 만들고 Windows에서 이 Redis를 사용할 것입니다. 또한 Azure Portal에서 Redis용 Azure 캐시를 만들고 애플리케이션과 함께 사용하는 방법도 알아봅니다.
분산 캐싱 (Distributed Caching)
분산 캐시(Distributed Caching) 는 여러 애플리케이션 서버에서 공유하는 캐시입니다. 분산 캐시(Distributed Caching) 는 동일한 데이터를 여러 서버에 일관되게 제공할 수 있고 한 서버가 다시 시작되거나 충돌하는 경우 캐시된 데이터를 다른 서버에서 정상적으로 계속 사용할 수 있기 때문에 애플리케이션 성능과 확장성을 향상시킵니다.

ASP.NET Core 6.0의 분산 캐싱
IDistributedCache 인터페이스는 실제 캐시에 대한 작업을 수행하기 위해 다음과 같은 방법을 제공합니다.
- Get, GetAsync - 문자열 키를 기반으로 캐시 서버에서 값을 가져옵니다. 이러한 메서드는 키를 수락하고 캐시된 항목을 바이트 [] 배열로 검색합니다.
- Set, SetAsync - 문자열 키와 값을 수락하고 캐시 서버로 설정합니다. 이 메서드는 키를 사용하여 캐시에 항목(byte [] 배열로)을 추가합니다.
- Refresh, RefreshAsync - 슬라이딩 만료 시간 초과를 재설정합니다. 이러한 메서드는 키를 기반으로 캐시의 항목을 새로 고치고 슬라이딩 만료 시간 초과를 재설정하는 데 사용됩니다.
- Remove, RemoveAsync – 문자열 키를 기반으로 캐시 데이터를 제거합니다.
ASP.NET Core에서 분산 캐시를 사용하기 위해 선택할 수 있는 여러 기본 제공 및 타사 구현이 있습니다.
- Distributed SQL Server cache - SQL Server distributed cache 를 사용하려면 이 패키지를 사용해야 합니다.
- Distributed Redis cache - Redis distributed cache 를 사용하려면 이 패키지를 사용해야 합니다.
- Distributed NCache cache - NCache distributed cache 를 사용하려면 이 패키지를 사용해야 합니다.
Redis Cache (레디스 캐시)란?
Redis는 데이터베이스, 캐시, 메시지 브로커 및 스트리밍 엔진으로 사용되는 오픈 소스(BSD 라이선스), 인메모리 데이터 구조 저장소입니다. Redis는 strings, hashes, lists, sets, sorted sets with range queries, bitmaps, hyperloglogs, geospatial indexes, streams 과 같은 데이터 구조를 제공합니다. Redis에는 복제, Lua 스크립팅, LRU 축출, 트랜잭션 및 다양한 수준의 디스크 지속성이 내장되어 있으며 Redis Sentinel 및 Redis 클러스터를 통한 자동 파티셔닝을 통해 고가용성을 제공합니다.
많은 프로그래밍 언어에서 Redis를 사용할 수 있습니다. Microsoft Azure는 Azure Cache for Redis라는 클라우드 기반 버전도 제공할 정도로 널리 사용되는 캐시입니다.
Windows 시스템에서 Redis 서버 실행
아래 링크에서 Windows 버전의 Redis 서버를 다운로드하여 컴퓨터의 어느 곳에서나 추출할 수 있습니다.
https://github.com/microsoftarchive/redis/releases/tag/win-3.0.504

위의 Zip 파일은 총 16개의 파일이 있습니다.

redis-server.exe 파일을 실행 하여 Redis 서버를 시작할 수 있습니다.
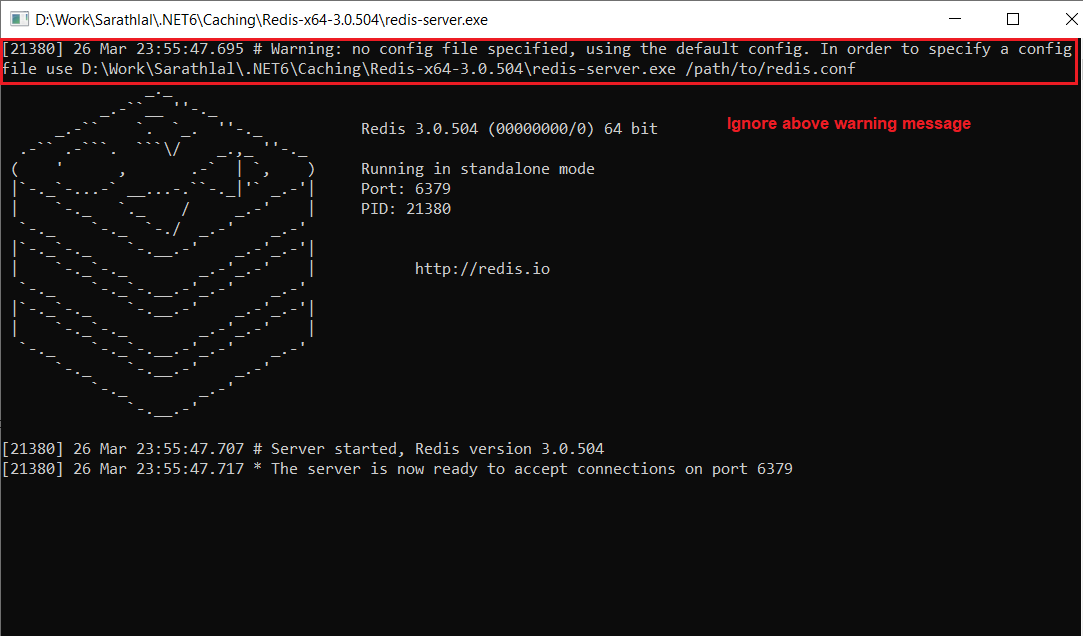
구성 파일이 지정되지 않았기 때문에 하나의 경고 메시지가 표시됩니다. 이 경고 메시지를 무시할 수 있습니다. 기본적으로 Redis는 포트 6379 에서 실행됩니다 .
Redis는 CLI를 하나 더 지원하며 이 CLI 도구를 사용하여 캐시 액세스 가능성을 확인할 수 있습니다. 같은 폴더 내에서 redis-cli.exe 를 실행할 수 있습니다 . ping 과 같은 명령을 입력하면 PONG 과 같은 응답을 받게 됩니다 .

위는 캐시가 활성 상태인지 여부를 확인하는 간단한 테스트입니다.
아래 명령을 사용하여 값을 설정하고 가져올 수 있습니다.

Set 명령은 지정된 키를 사용하여 값을 설정하고 get 명령을 사용하여 해당 키의 캐시에서 값을 검색할 수 있습니다.
이제 Web API 프로젝트를 생성할 수 있습니다. 웹 스크래핑을 사용하여 C# 코너 작성자 게시물(기사/블로그/뉴스) 세부 정보를 가져오고 이 데이터를 사용하여 캐싱 성능을 평가합니다. 이미 이 주제에 대한 자세한 기사를 작성했으며 자세한 내용은 아래 링크를 참조하십시오.
위 게시물에서 언급한 애플리케이션의 기존 코드를 사용하고 이 프로젝트에 캐싱 관련 코드를 추가합니다.
Visual Studio 2022를 사용하여 ASP.NET Core 6.0 Web API 만들기
Visual Studio 2022를 열고 ASP.NET Core Web API 템플릿을 사용하여 새 프로젝트를 만들 수 있습니다.

프로젝트에 유효한 이름을 지정하고 .NET 6.0 프레임워크를 선택할 수 있습니다.

"만들기" 버튼을 클릭하면 프로젝트가 생성됩니다.
NuGet 패키지 관리자를 사용하여 아래 라이브러리를 설치해야 합니다.
- HTMLAgilityPack
- Microsoft.EntityFrameworkCore.SqlServer
- Microsoft.EntityFrameworkCore.Tools
- Microsoft.Extensions.Caching.StackExchangeRedis
HtmlAgiltyPack 은 웹 스크래핑에 사용되고 Caching.StackExchangeRedis 는 Redis 캐싱에 사용됩니다. 엔티티 프레임워크 데이터베이스 작업에 두 개의 다른 라이브러리가 사용됩니다.
appsettings 내부에 데이터베이스 연결 문자열, Redis 연결 URL 및 병렬 작업 수를 추가할 수 있습니다.
appsettings.json
{
  "Logging": {
    "LogLevel": {
      "Default": "Information",
      "Microsoft.AspNetCore": "Warning"
    }
  },
  "AllowedHosts": "*",
  "RedisCacheUrl": "127.0.0.1:6379",
  //"RedisCacheUrl": "sarathlal.redis.cache.windows.net:6380,password=k6CRosKzTY9vXMqH76F8rbl7m8PntopEwAzCaPcTyeM=,ssl=True,abortConnect=False", // For Azure Redis Cache. Currently this resource is not available
  "ConnectionStrings": {
    "ConnStr": "Data Source=(localdb)\\MSSQLLocalDB;Initial Catalog=AnalyticsDB;Integrated Security=True;ApplicationIntent=ReadWrite;MultiSubnetFailover=False"
  },
  "ParallelTasksCount": 20
}
데이터베이스 연결 문자열은 엔터티 프레임워크에서 SQL 데이터베이스를 연결하는 데 사용되며 병렬 작업 수는 웹 스크래핑 병렬 foreach 코드에 사용됩니다. RedisCacheUrl은 애플리케이션과 Redis 서버 간의 연결을 설정하는 데 사용됩니다.
Models 폴더 안에 Feed 클래스를 생성할 수 있습니다 . 이 클래스는 C# 코너 RSS 피드에서 필요한 정보를 얻는 데 사용됩니다.
Feed.cs
namespace RedisCacheASP.NET6.Models
{
    public class Feed
    {
        public string Link { get; set; }
        public string Title { get; set; }
        public string FeedType { get; set; }
        public string Author { get; set; }
        public string Content { get; set; }
        public DateTime PubDate { get; set; }

        public Feed()
        {
            Link = "";
            Title = "";
            FeedType = "";
            Author = "";
            Content = "";
            PubDate = DateTime.Today;
        }
    }
}
Models 폴더 안에 ArticleMatrix 클래스를 생성할 수 있습니다. 이 클래스는 웹 스크래핑 후 입수한 각 기사/블로그/뉴스에 대한 정보를 얻는 데 사용됩니다.
ArticleMatrix.cs
using System.ComponentModel.DataAnnotations.Schema;

namespace RedisCacheASP.NET6.Models
{
    public class ArticleMatrix
    {
        public int Id { get; set; }
        public string? AuthorId { get; set; }
        public string? Author { get; set; }
        public string? Link { get; set; }
        public string? Title { get; set; }
        public string? Type { get; set; }
        public string? Category { get; set; }
        public string? Views { get; set; }
        [Column(TypeName = "decimal(18,4)")]
        public decimal ViewsCount { get; set; }
        public int Likes { get; set; }
        public DateTime PubDate { get; set; }
    }
}
Entity 프레임워크에 대한 DB 컨텍스트 클래스를 만들 수 있습니다.
MyDbContext.cs
using Microsoft.EntityFrameworkCore;

namespace RedisCacheASP.NET6.Models
{
    public class MyDbContext : DbContext
    {
        public MyDbContext(DbContextOptions<MyDbContext> options)
            : base(options)
        {
        }
        public DbSet<ArticleMatrix>? ArticleMatrices { get; set; }

        protected override void OnModelCreating(ModelBuilder builder)
        {
            base.OnModelCreating(builder);
        }
    }
}
나중에 이 MyDbContext 클래스를 사용하여 데이터베이스에 데이터를 저장합니다.
API 컨트롤러 AnalyticsController를 만들고 내부에 웹 스크래핑 및 캐싱 관련 코드를 추가할 수 있습니다.
AnalyticsController.cs
using HtmlAgilityPack;
using Microsoft.AspNetCore.Mvc;
using Microsoft.Extensions.Caching.Distributed;
using RedisCacheASP.NET6.Models;
using System.Globalization;
using System.Net;
using System.Text;
using System.Text.Json;
using System.Xml.Linq;
namespace RedisCacheASP.NET6.Controllers
{
[Route("[controller]")]
[ApiController]
public class AnalyticsController : ControllerBase
{
readonly CultureInfo culture = new("en-US");
private readonly MyDbContext _dbContext;
private readonly IConfiguration _configuration;
private static readonly object _lockObj = new();
private readonly IDistributedCache _cache;
public AnalyticsController(MyDbContext context, IConfiguration configuration, IDistributedCache cache)
{
_dbContext = context;
_configuration = configuration;
_cache = cache;
}
[HttpPost]
[Route("CreatePosts/{authorId}")]
public async Task<bool> CreatePosts(string authorId)
{
try
{
XDocument doc = XDocument.Load("https://www.c-sharpcorner.com/members/" + authorId + "/rss");
if (doc == null)
{
return false;
}
var entries = from item in doc.Root.Descendants().First(i => i.Name.LocalName == "channel").Elements().Where(i => i.Name.LocalName == "item")
select new Feed
{
Content = item.Elements().First(i => i.Name.LocalName == "description").Value,
Link = (item.Elements().First(i => i.Name.LocalName == "link").Value).StartsWith("/") ? "https://www.c-sharpcorner.com" + item.Elements().First(i => i.Name.LocalName == "link").Value : item.Elements().First(i => i.Name.LocalName == "link").Value,
PubDate = Convert.ToDateTime(item.Elements().First(i => i.Name.LocalName == "pubDate").Value, culture),
Title = item.Elements().First(i => i.Name.LocalName == "title").Value,
FeedType = (item.Elements().First(i => i.Name.LocalName == "link").Value).ToLowerInvariant().Contains("blog") ? "Blog" : (item.Elements().First(i => i.Name.LocalName == "link").Value).ToLowerInvariant().Contains("news") ? "News" : "Article",
Author = item.Elements().First(i => i.Name.LocalName == "author").Value
};
List<Feed> feeds = entries.OrderByDescending(o => o.PubDate).ToList();
string urlAddress = string.Empty;
List<ArticleMatrix> articleMatrices = new();
_ = int.TryParse(_configuration["ParallelTasksCount"], out int parallelTasksCount);
Parallel.ForEach(feeds, new ParallelOptions { MaxDegreeOfParallelism = parallelTasksCount }, feed =>
{
urlAddress = feed.Link;
var httpClient = new HttpClient
{
BaseAddress = new Uri(urlAddress)
};
var result = httpClient.GetAsync("").Result;
string strData = "";
if (result.StatusCode == HttpStatusCode.OK)
{
strData = result.Content.ReadAsStringAsync().Result;
HtmlDocument htmlDocument = new();
htmlDocument.LoadHtml(strData);
ArticleMatrix articleMatrix = new()
{
AuthorId = authorId,
Author = feed.Author,
Type = feed.FeedType,
Link = feed.Link,
Title = feed.Title,
PubDate = feed.PubDate
};
string category = "Videos";
if (htmlDocument.GetElementbyId("ImgCategory") != null)
{
category = htmlDocument.GetElementbyId("ImgCategory").GetAttributeValue("title", "");
}
articleMatrix.Category = category;
var view = htmlDocument.DocumentNode.SelectSingleNode("//span[@id='ViewCounts']");
if (view != null)
{
articleMatrix.Views = view.InnerText;
if (articleMatrix.Views.Contains('m'))
{
articleMatrix.ViewsCount = decimal.Parse(articleMatrix.Views[0..^1]) * 1000000;
}
else if (articleMatrix.Views.Contains('k'))
{
articleMatrix.ViewsCount = decimal.Parse(articleMatrix.Views[0..^1]) * 1000;
}
else
{
_ = decimal.TryParse(articleMatrix.Views, out decimal viewCount);
articleMatrix.ViewsCount = viewCount;
}
}
else
{
var newsView = htmlDocument.DocumentNode.SelectSingleNode("//span[@id='spanNewsViews']");
if (newsView != null)
{
articleMatrix.Views = newsView.InnerText;
if (articleMatrix.Views.Contains('m'))
{
articleMatrix.ViewsCount = decimal.Parse(articleMatrix.Views[0..^1]) * 1000000;
}
else if (articleMatrix.Views.Contains('k'))
{
articleMatrix.ViewsCount = decimal.Parse(articleMatrix.Views[0..^1]) * 1000;
}
else
{
_ = decimal.TryParse(articleMatrix.Views, out decimal viewCount);
articleMatrix.ViewsCount = viewCount;
}
}
else
{
articleMatrix.ViewsCount = 0;
}
}
var like = htmlDocument.DocumentNode.SelectSingleNode("//span[@id='LabelLikeCount']");
if (like != null)
{
_ = int.TryParse(like.InnerText, out int likes);
articleMatrix.Likes = likes;
}
lock (_lockObj)
{
articleMatrices.Add(articleMatrix);
}
}
});
_dbContext.ArticleMatrices.RemoveRange(_dbContext.ArticleMatrices.Where(x => x.AuthorId == authorId));
foreach (ArticleMatrix articleMatrix in articleMatrices)
{
if (articleMatrix.Category == "Videos")
{
articleMatrix.Type = "Video";
}
articleMatrix.Category = articleMatrix.Category.Replace("&", "&");
await _dbContext.ArticleMatrices.AddAsync(articleMatrix);
}
await _dbContext.SaveChangesAsync();
await _cache.RemoveAsync(authorId);
return true;
}
catch
{
return false;
}
}
[HttpGet]
[Route("GetAll/{authorId}/{enableCache}")]
public async Task<List<ArticleMatrix>> GetAll(string authorId, bool enableCache)
{
    if (!enableCache)
    {
        return _dbContext.ArticleMatrices.Where(x => x.AuthorId == authorId).OrderByDescending(x => x.PubDate).ToList();
    }
    string cacheKey = authorId;

    // Trying to get data from the Redis cache
    byte[] cachedData = await _cache.GetAsync(cacheKey);
    List<ArticleMatrix> articleMatrices = new();
    if (cachedData != null)
    {
        // If the data is found in the cache, encode and deserialize cached data.
        var cachedDataString = Encoding.UTF8.GetString(cachedData);
        articleMatrices = JsonSerializer.Deserialize<List<ArticleMatrix>>(cachedDataString);
    }
    else
    {
        // If the data is not found in the cache, then fetch data from database
        articleMatrices = _dbContext.ArticleMatrices.Where(x => x.AuthorId == authorId).OrderByDescending(x => x.PubDate).ToList();

        // Serializing the data
        string cachedDataString = JsonSerializer.Serialize(articleMatrices);
        var dataToCache = Encoding.UTF8.GetBytes(cachedDataString);

        // Setting up the cache options
        DistributedCacheEntryOptions options = new DistributedCacheEntryOptions()
            .SetAbsoluteExpiration(DateTime.Now.AddMinutes(5))
            .SetSlidingExpiration(TimeSpan.FromMinutes(3));

        // Add the data into the cache
        await _cache.SetAsync(cacheKey, dataToCache, options);
    }
    return articleMatrices;
}
}
}
위의 컨트롤러 내부에는 두 가지 메서드가 있습니다.
"CreatePosts"는 특정 C# 코너 작성자에 대해 작성된 게시물 데이터를 가져와 데이터베이스에 저장합니다.
AnalyticsController.cs 의 GetAll 메서드
[HttpGet]
[Route("GetAll/{authorId}/{enableCache}")]
public async Task<List<ArticleMatrix>> GetAll(string authorId, bool enableCache)
{
if (!enableCache)
{
return _dbContext.ArticleMatrices.Where(x => x.AuthorId == authorId).OrderByDescending(x => x.PubDate).ToList();
}
string cacheKey = authorId;
// Trying to get data from the Redis cache
byte[] cachedData = await _cache.GetAsync(cacheKey);
List<ArticleMatrix> articleMatrices = new();
if (cachedData != null)
{
// If the data is found in the cache, encode and deserialize cached data.
var cachedDataString = Encoding.UTF8.GetString(cachedData);
articleMatrices = JsonSerializer.Deserialize<List<ArticleMatrix>>(cachedDataString);
}
else
{
// If the data is not found in the cache, then fetch data from database
articleMatrices = _dbContext.ArticleMatrices.Where(x => x.AuthorId == authorId).OrderByDescending(x => x.PubDate).ToList();
// Serializing the data
string cachedDataString = JsonSerializer.Serialize(articleMatrices);
var dataToCache = Encoding.UTF8.GetBytes(cachedDataString);
// Setting up the cache options
DistributedCacheEntryOptions options = new DistributedCacheEntryOptions()
.SetAbsoluteExpiration(DateTime.Now.AddMinutes(5))
.SetSlidingExpiration(TimeSpan.FromMinutes(3));
// Add the data into the cache
await _cache.SetAsync(cacheKey, dataToCache, options);
}
return articleMatrices;
}
"GetAll" 메서드는 작성자의 데이터베이스/캐시에서 데이터를 가져옵니다. 캐싱의 성능을 검사하기 위해 이 메서드에 "enableCache" 매개변수를 추가했습니다.
작성자에 대한 데이터를 가져올 때 먼저 작성자 ID를 키로 사용하여 캐시 내부를 확인합니다. 데이터를 사용할 수 있는 경우 데이터를 역직렬화하여 모델링하고 반환합니다. 그러나 데이터를 사용할 수 없거나 만료된 경우 데이터베이스에서 데이터를 가져와 Redis 캐시로 설정합니다.
아래 코드 변경으로 Program.cs 클래스를 변경해야 합니다. 그래서 Entity 프레임워크 연결과 Redis 캐시 연결이 제공되었습니다.
Program.cs
using Microsoft.EntityFrameworkCore;
using RedisCacheASP.NET6.Models;

var builder = WebApplication.CreateBuilder(args);
ConfigurationManager configuration = builder.Configuration;

// Add services to the container.

builder.Services.AddControllers();
// Learn more about configuring Swagger/OpenAPI at https://aka.ms/aspnetcore/swashbuckle
builder.Services.AddEndpointsApiExplorer();
builder.Services.AddSwaggerGen();

builder.Services.AddDbContext<MyDbContext>(options => options.UseSqlServer(configuration.GetConnectionString("ConnStr")));
builder.Services.AddStackExchangeRedisCache(options => { options.Configuration = configuration["RedisCacheUrl"]; });

var app = builder.Build();

// Configure the HTTP request pipeline.
if (app.Environment.IsDevelopment())
{
    app.UseSwagger();
    app.UseSwaggerUI();
}

app.UseAuthorization();

app.MapControllers();

app.Run();
마이그레이션 명령을 사용하여 SQL 데이터베이스와 테이블을 생성할 수 있습니다.
아래 명령을 사용하여 패키지 관리자 콘솔에서 마이그레이션 스크립트를 생성할 수 있습니다.
PM > add-migration InititalScript
위의 명령은 새 마이그레이션 스크립트를 생성합니다. 아래 스크립트를 사용하여 데이터베이스와 테이블을 생성할 수 있습니다.
PM> update-database
애플리케이션을 실행하고 Postman 도구를 사용하여 C# Corner 게시물 데이터를 몇 개 생성하고 데이터베이스에 저장할 수 있습니다.
로컬 Redis 캐시 서버도 실행해야 합니다. ( redis-server.exe 파일 실행)
특정 C# 코너 작성자에 대한 게시물을 작성할 수 있습니다. 여기에서는 내 자신의 작성자 ID를 사용하고 있습니다. (저자 ID는 C# 코너 프로필에서 얻을 수 있습니다)
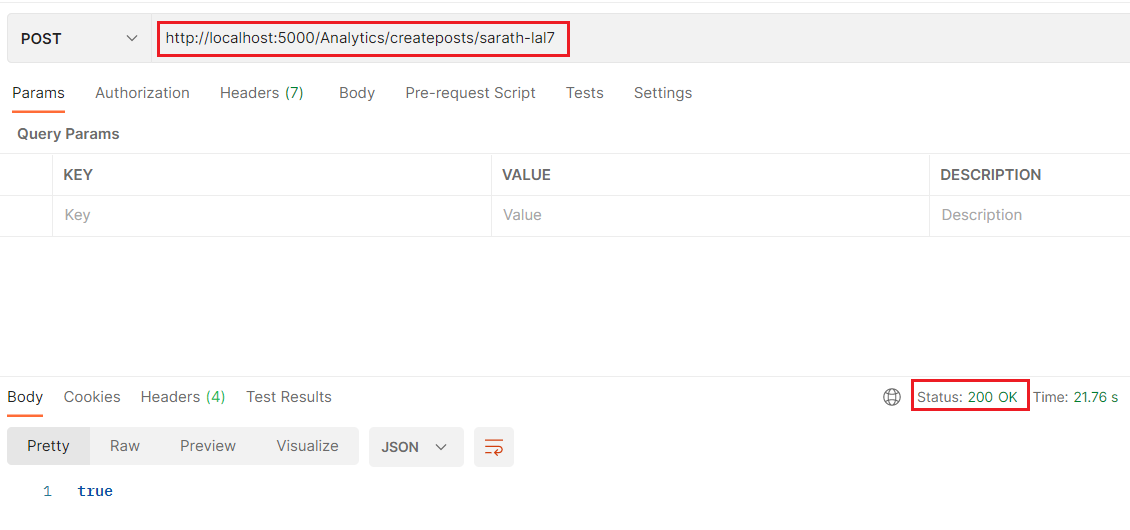
내 작성자 ID에 대해 작성된 게시물 세부 정보가 100개 있습니다. Postman에서 이러한 데이터를 가져올 수 있습니다.

데이터를 가져오는 데 21밀리초가 소요되었습니다. 캐시에 사용할 수 있는 데이터가 없고 데이터베이스에서 직접 데이터를 가져오기 때문입니다.
이제 데이터를 다시 가져올 수 있습니다.
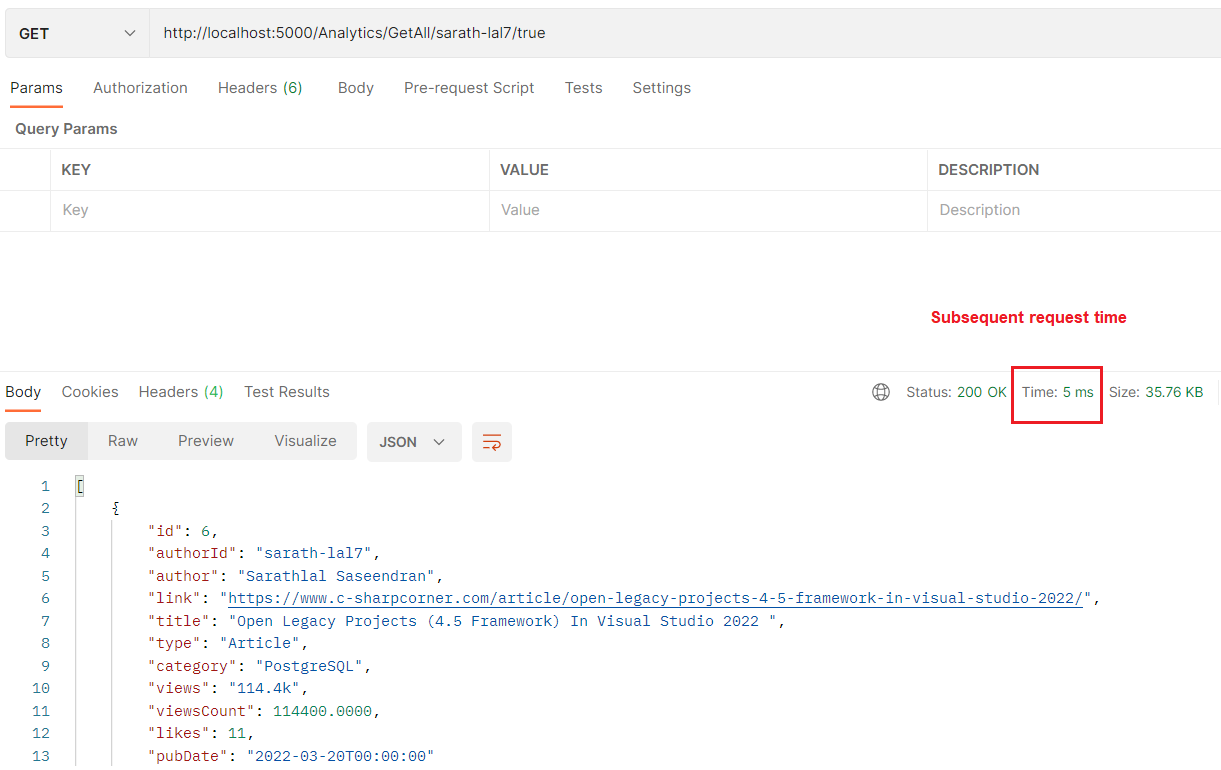
상당한 성능 향상이 있음을 알 수 있습니다. 불과 5밀리초밖에 걸리지 않았습니다. 데이터베이스 대신 Redis 캐시에서 데이터를 가져오기 때문입니다.
이제 캐싱 없이 데이터를 가져올 수 있습니다. 캐시를 활성화 또는 비활성화하는 "GetAll" 메서드에 이미 매개변수를 추가했습니다.

이번에는 캐시 플래그를 false로 전달했기 때문에 데이터베이스에서 직접 데이터를 가져옵니다. 데이터베이스에서 동일한 데이터를 가져오는 데 30밀리초가 걸렸다는 것을 알 수 있습니다. 데이터베이스에서 방대한 데이터를 가져오는 경우 Redis 캐시를 사용하여 더 많은 개선을 볼 수 있습니다.
이제 Redis용 Azure 캐시를 만들고 애플리케이션으로 확인할 수 있습니다.
Azure Portal에서 Redis용 Azure Cache 만들기
데이터베이스 탭에서 Azure Cache for Redis를 선택합니다.

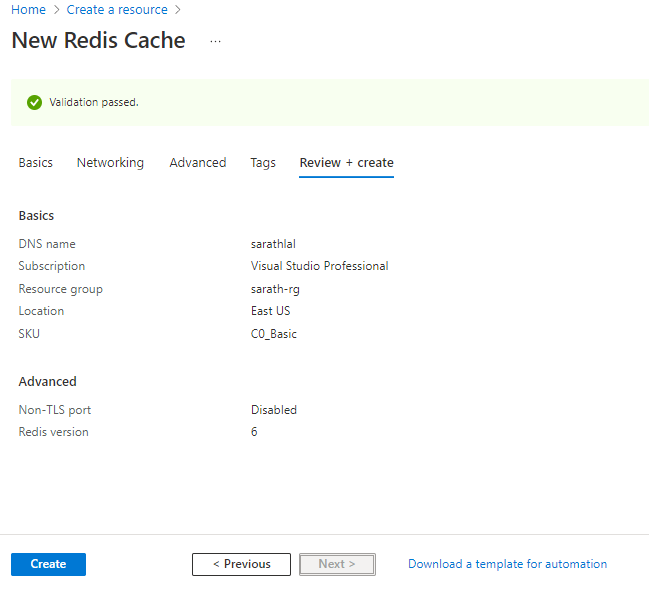
새 리소스 그룹을 생성하거나 기존 리소스 그룹을 선택하고 Redis 인스턴스에 유효한 이름을 지정할 수 있습니다. Redis 캐시에는 다양한 요금제가 있습니다. 테스트 목적으로 기본 플랜을 선택했습니다.

Redis 버전을 선택합니다. 기본적으로 선택된 버전은 4입니다. 현재 두 가지 버전을 사용할 수 있습니다. Redis 캐시용으로 버전 6을 선택했습니다.

유효성 검사가 통과되면 "만들기" 버튼을 클릭하여 배포를 시작할 수 있습니다.
배포에는 시간이 걸립니다. 배포 후 리소스를 열고 액세스 키 표시 링크를 클릭할 수 있습니다.

그러면 팝업 창이 열리고 다양한 캐시 키가 표시됩니다. 기본 연결 문자열을 선택할 수 있습니다.

이 기본 연결 문자열을 가져와서 appsetting에서 교체합니다(현재 로컬 Redis 서버 연결 문자열을 제공했습니다).
이제 로컬 Redis 서버 없이 애플리케이션을 실행할 수 있습니다.
Azure에서 애플리케이션을 호스팅하는 경우 Azure Redis 캐시를 사용하는 동안 상당한 성능 향상을 볼 수 있습니다.
결론
이 게시물에서는 분산 캐싱과 Redis 캐시에 대해 논의했습니다. Windows 시스템에 Redis 캐시 서버를 설치하고 테스트하는 방법을 살펴보았습니다. 그런 다음 ASP.NET 6.0 Web API를 만들었으며 Windows의 로컬 Redis 서버와 함께 사용됩니다. 또한 Azure Portal에서 Redis용 Azure 캐시를 만들고 이를 애플리케이션과 함께 사용하는 방법을 살펴보았습니다.
출처
Easily Use Redis Cache In ASP.NET 6.0 Web API
In this post, we will see how to use Redis cache in .NET 6.0 Web API
www.c-sharpcorner.com
'닷넷관련 > ASP.NET CORE 🍔' 카테고리의 다른 글
| React 및 Asp Net Core 3 애플리케이션을 IIS 로 운영하기 (2) | 2022.04.21 |
|---|---|
| ASP.NET CORE 6.0 - Single ASP.NET Core Application 에서 MVC, Razor Pages, Blazor, API Controllers, Minimal APIs 전부 사용해 보기 (0) | 2022.04.12 |
| ASP.NET Core 5.0 에서 IDataProtector 활용하여 데이터 보호하는 방법 (0) | 2022.03.11 |
| .NET 6.0 - Web Api 를 통해 Refresh Tokens 와 함께 JWT 인증 Tutorial (0) | 2022.02.28 |
| .NET Core 에서 Dependency Injection (DI) 알아보기 (0) | 2021.12.07 |